
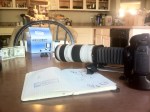
Sometimes you’ve just got a fever and there’s only one cure: More macro. And if you want those delicious, detail-rich extreme close ups you can end up shelling out about $1,000 for a dedicated macro lens. Or, if you’re cheap like me you can try out this macro bellows set up for about $40.
How It Works
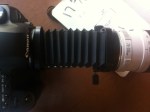
The macro bellows allows you to use any of your lenses as a macro. Basically, you’re increasing the magnification factor of your lens by extending the distance between your lens and your camera’s sensor. It’s a decidedly low-tech, low cost method. But, it does the job.
Quick Review
Overall, I’m pretty impressed with how the bellows works. It feels solid, attaches firmly to lens and camera, and lends your rig a decidedly old school photography vibe. It’s Ansel all the way. And, it gives you some serious magnification power. With a little experimentation, I was easily getting 3:1 ratios. That’s 3x actual size of the object. That’s pretty sweet.
Downside? As you’ll see in the photos below, this thing isn’t exactly portable. Although to be honest, you’re not exactly going to be going run-n-gun on those macro shots, are you?
******Warning! Nerdy technical chatter ahead. Skip ahead to the photos and video if you don’t care.******
<nerd>
Another challenge to overcome is that the bellows has no electronic connection to your camera, so you can’t control the lens aperture while shooting.
The simple workaround for this problem is to attach the lens to your camera first, set your desired aperture, then press your camera’s depth of field preview button and detach your lens.
The lens will “lock in” at the aperture you’ve just previewed. My 24-105 and 70-200 lenses both default to f/4 and that gave me a pleasing DOF in my quick tests (see below). My 50mm 1.8, on the other hand, was way too shallow to be useful without first stopping it down to about f/4.
</nerd>
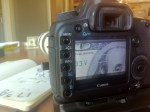
The real plus for me is the extreme close ups you can achieve with this bit of kit using your DSLR for video. Recently I needed to get some really good detail shots of a gold nugget collection and this macro set up would have been very handy. Another handy use? Wedding ring shots.
You don’t need those XCU’s all the time. But when you do, nothing else will do…do you follow?
Here are a few shots I put together to try out the macro capabilities for video.
Bottom Line
If you’ve been wanting to add macro ability to your tool set, for $40 and a little patience this macro bellows is a tiny expense that makes a big impression.

-

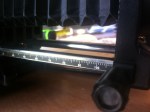
- Maximum close up I can achieve with my 5D Mark II and my 24-105L lens
-

- Now with the same lens attached to the macro bellows…


2 comments on “Shooting Macro on a Budget”